Monday 28 February 2011

Livetype and Soundtrack Pro

Livetype
Livetype is a program I will be using when creating my open Thriller sequence. This software allows you to create Texts with various fonts and background affects. We will create our Title sequence with this program and we learned the ways to use it and how to use most of its features. In Livetype you are creating a title sequence which will then be imported back into an editing program like Final Cut Pro where you can change eth length effects placed on it. 
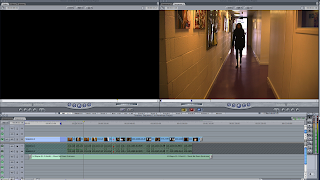
Layout: The upper left window is called the canvas; this is where you view the text your working on. The words, effects and changes appear there. In the middle of the display shows the inspector window. This is where the basic type of text, colour and style are chosen. The window that appears in the upper right corner is the Media Browser; this controls all fonts, transition effects and animations. The lower part of the display is the timeline where the actual video clip is.
You can choose between a standard font and an animated font. If you click the texture tab you can add a background to the title sequence. Just select the texture you want then apply to track at the bottom of the media bar. On the canvas the background will appear behind the text.
Once finished go to file and Render movie, select a location for export and then you will have a quick time file you can then import into whatever editing program you are working on for example Final Cut Pro


Soundtrack pro
Soundtrack Pro is a program used to create audio, which can be used for another clip like our Thriller opening sequence. We will use this software in our work. Soundtrack Pro will enable us to use a range of beats and sounds to create the perfect audio for our Thriller Opening. We will have access to audios which use Drums, Trumpets and Violins which all can lead to a thrilling, suspenseful build up during our clip. You do this by selecting the ‘search’ tab then ‘instruments’ and you can choose from a range of instruments. 


Final Cut Pro:
Final Cut Pro is an editing program we will use when editing our footage and our final Thriller opening Sequence. All Films are edited as the footage which is filmed doesn’t always flow smoothly or appear as the Director wants it to. Editing allows you to remove parts of the footage where mistakes have been made or just take out unnecessary parts of the clip. If you want a successful film the editing process is vital.
Final Cut Pro can be used to add special effects like ‘fade’ and slowing down the clip to create ‘slow motion’.
Basic Skills:
When starting, drag your clip to the viewer window. To trim click mark in icon or ‘I’ and mark out or ‘O’ to trim the clip. Then drag the clip to viewer icon.
On the tool bar there is a ‘CUT’ icon which allows you t shorten parts of the clips on the timeline.
Uploading
When saving the edited clip you need to export the as a quick-time and upload it to our blog using handbrake. When uploading make a copy and resize the clip, export file clip for quick time movie click on the clip and take it to handbrake. Select the named clip, then your group (In our case group 5) and click ‘IPOD’ and start. Then the clip will have been uploaded to your group in blogger.


Thursday 24 February 2011

Distribution and Production Companies

Inception (2010)
Description: In a world where technology exists to enter the human mind through dream invasion, a highly skilled thief is given a final chance at redemption which involves executing his toughest job to date: Inception
Genre: Sci-fi Action Thriller (Psychological)
Director: Christopher Nolan
Distribution and Production Company’s: Warner Bros. Pictures in association with Legendary Pictures, a Syncopy Production.
Box Office: Screened in 1,500 Locations overall film made $62.7 million and debuted at #1 in its opening weekend. Worldwide it grossed $800 million.

 Inception Poster  

The Dark Night (2010)
Description: Batman, Gordon and Harvey Dent are forced to deal with the chaos unleashed by an anarchist mastermind known only as the Joker, as he drives each of them to their limits.
Genre: Superhero Thriller (Action Thriller)
Director: Christopher Nolan
Distribution and Production Company’s: Warner Bros. Pictures
Box Office: It grossed $67 million in its opening day setting a new record. Also it received $ 1 billion in revenue worldwide.
 
Possible Production/Distribution for My Thriller Film

If i created by own filmi would want the Production/Distribution company to be Warner Bros. Pictures. This is because I would want my film to be produced by an conglomerate. and  A conglomerate production means the film has higher budget for marketing and production and therefore the film could become a Blockbuster and do well in terms of Box Office sells.  Warner Bros. Pictures could distribute the film on a major a scale, in terms of making it be screened in many cinemas and even IMAX screens; also they could exchange DVD’s on a high level to retailers. Inception and The Dark Knight were both Produced/Distributed by Warner Bros. Pictures and had highly successful on Box Office and were distributed on a large scale. 
However we aren't produced by a Conglomerate company but will be an independent film. Our production and distribution company will be Candi Studios. This is because Candi studios will provide us with our production equipment.

Wednesday 23 February 2011


Final Preliminary Clip
We made a prelim storyboard using jelly babies. The purpose of this planning is that it allowed us to film the actual clip with a plan and idea. We filmed our prelim clip and the objective of this task was to understand the 180 degree rule and how to use the editing programmes effectively in the sense that we applied sound and credits to the final clip.

Filming the Clip
We used prelim storyboard to full effect by filming according our pan. In fairness as the cameraman I think I understood the 180 degree rule well and it was definitely good practice. I enjoyed filming as I developed my camera skills and I now have a better understanding of how to use the camera. Our plan was to get a range of different shots in the clip so we could have an idea of what shots worked well, and therefore we could use it in our opening thriller sequence. We were able to do this and include the following shots: Close up, Medium shot, High and Low angle shot, Long shot, over the shoulder shot and shot reverse shot.  During the filming process as the cameraman I felt that the plan was highly useful as it outlined what shots I needed to include and the filming process was much quicker.
Editing
We used Final Cut Pro to edit our clip. The editing process allowed us to understand how to manipulate the software better. When editing we made several cuts to make the clip short and to ensure it flowed smoothly. I would say the most challenging part of the editing was trying to make the shot reverse shots run smoothly, but I feel they were edited well. We speeded up parts of the clip and faded the ending of the clip, but whilst we edited the footage we still needed to edit the credits and add a sound track.

Adding Credits
We used program software Live Type to add a title sequence to the clip. The important part to consider when adding text was the order in which the credits would appear and what we would include. From our previous experience of viewing title sequences we came up with the following: Distribution Company, Cast, Producer, and then Director. We made the Director last as in many films the director is seen as the most important person and also in Avatar James Cameron is the last part of the title sequence although this may be in place as his a successful director and may be used to attract the title audience.
Using Live Type we used sans serif font as it looks more relaxed. We opted for a steamy fog background within the font as it was relaxed and stood out against the black background. We made the font slide in by choosing ‘effects’ then ‘Screech’ the effect of this is that it gets the audience’s attention and is more creative. We also made some parts of the credits side into the bottom of the screen as they aren’t as important as the director’s name and the distributor’s names which appear in the middle of the screen. We then added moved the text to final cut pro and placed it on the time line at the start because we wanted it to quickly pass through and get straight into the clip.


Applying Sound
We used Sound Track Pro to add a soundtrack to the clip. Sound Track Pro allowed us to create and add existing sound to our project. We chose to create a sound using the program and we used an ‘atmospheric beat’. We didn’t include dialogue as we mainly wanted to develop our skills using the program and the dialogue within the clip wasn’t necessary. During my time I learned how to make the music fit the moving image. We used tools such as ‘fade’ to this. An example of ‘fade’ in the clip would be at the end of the prelim where we faded music so it ended in time with the moving image.


As the editing, sound track and credits took place on separate programs, in order to get them all into one clip we used Final Cut Pro. The moving image (footage) was already on the program as we edited it using the same software. However we imported the sound track and Title Sequence into the Final Cut. Then we positioned the Credits at the beginning of the clip, and the Soundtrack was positioned at a length that would let it sound for the whole clip.

Monday 7 February 2011

Intertexuality Continued

Intertexuality Continued
Intertexuality is the term to describe when certain aspects of a film are borrowed into other films. The use of borrowing builds link between films, Intertexuality can build comparisons between films and reveal things to the audience for example the genre of the film can be revealed through the Intertexuality installed in the film, as the audience may see this relates to another film they have seen.
I have shown how ‘Fatal Attraction’ borrows from thriller classic ‘PHYSCO’. But ‘PHYCHO’ has also influenced films such as ‘The Stepfather’, ‘What Lies Beneath’ and ‘Succubus’ (Succubus is a student thriller).
What Lies Beneath
Aspects borrowed from ‘PSYCHO’: In this film the women is taken from another room into the bathroom. There are two similarities. The first is that in both films the main characters move from one place into the bathroom. The second is that they main part in both scenes takes place within the bathroom. Furthermore the sound of water leads up to a climax where the attack happens. The sound of water may be a signal to us to show us that attack is evident. Moreover the bathroom setting further reinforces this. The last similarity is that women are the victims and they could be a stereotypes outlining they are vulnerable, or the fact men are the attackers shows men the dominant attackers in thrillers.
The Stepfather
Aspects borrowed from ‘PSYCHO’: The Stepfather is about a man who transfers from household to household attacking the families involved, he targets single mothers with children. This film too has an identical setting to ‘PSYCHO’ in the sense that both attacks take place in a bathroom. This shows that in thrillers there are some aspects that will appear in many of them. Additionally camera movement is similar, when the man is stabbed he falls backwards into the shower curtain, this resembles ‘PSYCHO’ as in the classic thriller the women after being attacked also fall into the shower curtain, and the camera zooms out as we see them from a long shot as there life dims out. Also although the man is one attacked in the end in ‘Stepfather he was the original aggressor and attacker, consequently the theme of making women victims is continued. Lastly a shiny knife is used in both films so
Succubus (Student thriller)
In this film the students use the shiny knife as the murder weapon which is also used in ‘PSYCHO’. The blood in the shower also relates to the blood in ‘PSYCHO’ when the woman is attacked.  The trend of the bathroom being the seeing of attacks continues, and the music in both films is similar. However one difference is that in ‘PSYCHO’ the woman is the victim but in ‘Succubus’ the woman is the attacker so the roles have been reversed as the women attacks the man.


Introduction to Camera

INTRODUCTION
In todays lesson we were introduced to skills needed to use the professional cameras. In order to begin filming ,we were taught key instructions and key factors on how to use the camera. We were taught necessary techniques in ways to manage both the camera and the equipment  and key skills needed to ensure that we capture good quality footage.

I LEARNT HOW TO:


  • Insert both the Memory card + Battery correctly into the camera
  • To turn the camera on & off
  • To ensure the camera lens of the camera is open before filming + is close after filming.
  • To ensure the camera is in focus before filming.
  • To connect the camera on the tripod.
  • To ensure that the legs of the tripod are opened out accurately, ensuring that the legs are the same length and the tripiod
  • To ensure the camera is locked on properly to the tripod to avoid it falling off or causing the camera to wobble
  • To ensure that the camera is locked when on thr tripod and to release the camera of the tripod press the red button then slide backwards.

Suspense in Black Swan

Suspense in Black Swan

The film " Black Swan reflects a key example of the build up of suspense. This is a effective technique used in most thriller movies to give the audience a feeling of  uncertainty and anxiety about what will happen next during the movie. The use of suspense causes tension within the film, as it grabs the audiences attention making them wanting to continue watching.
Below shows a clip of the build up of suspense in Black Swan.


In the clip shown above, suspense is built up using a variation of camera shots. Through the use of both an over the shoulder shot and tracking, the audience is able to track the movement of the character ; Nina. Through both a mid- shot of her surroundings and a close up of her face , the use of suspense is indicated clearly here as we see that she is alone walking down an empty alleyway. Also,through the close up of her face, we see her scared expression as she notices a suspicious body of a women further down the alleyway.

Planning of our Preliminary Project

Planning of our Preliminary Project

We were given a preliminary task in which we had to create a clip which was centred on a conversation between two people. I think the objective of the task was to familiarise us with the process of completing a clip. This process includes using the cameras, editing, adding credits (part of editing) and also adding a soundtrack. However before this process planning is essential. Planning allows you to assess likely complications and problems in the future, therefore these problems can be addressed, planning is vital if you want to reduce the risks of future problems. Lastly planning allows you to edit you ideas if you plan it and it allows you to start you work with a focus rather than waste time later.
Firstly as this was a plan we didn’t use the same props, setting or equipment as we would in the actual clip. Therefore we used Jelly babies as symbols of the actors; they were simply props representing the actor who would appear in the actual clip. Due to the fact we used jelly babies we created a paper setting. Within this paper setting we had a corridor and a room. This resembled the corridor and room we would use in the actual film. As this task was set up for us to develop various techniques we didn’t spend too much time making the setting.
Secondly, we were introduced to the 180 degree rule. The 180 degree rule involves orientating the viewer. When you show where people are you show the 180 degree rule. For example in the clip below there is a middle shot of two people having a conversation. We see the woman is on the left and the man on the right. Therefore when we see them the man should remain on the left and the woman on the right. On the overhead shot you can see the camera placement and180 degree line. The camera shouldn’t move across or over this line but may move along the line. The reason for this is if the rule is broken the camera view shows the actors facing the same direction or changing sides. Therefore to make the clip realistic and to a high standard this rule must be mastered.
Thirdly after we considered the ways in which we keep the one 180 degree rule, we planned what camera shots we would include. We decided we wanted to experiment with different shots to allow us to get use to taking these shots.
·         Close up, Medium shot, High and Low angle shot, Long shot, over the shoulder shot and shot reverse shot.
Getting use to taking different camera shots is important because different shots have different effect therefore by knowing how to take different shots you increase the quality and efficiency of the clip.

Starting the filming of the jelly babies
Once we set up the background (setting) for the preliminary clip we took photos representing the way we would film it. As the objective was just to improve our film making skills we didn’t focus on making the film suspenseful or thrilling but rather tried to familiarise ourselves with the 180 degree rule and different camera movements and shots. We were able to include all the planned camera shots in our jelly baby clip, whilst keeping the 180 degree rule.
Once completed, we edited these photos using Final Cut Pro and made them align into a story board. The clip was too long so we changed the speed of some shots and cut short to make them shorter. When finished we started to prepare to film the actual prelim film.  
Movie Making Techniques 180 Degree Rule 


Jelly Baby Clip


My Analysis of the Film Black Swan

Black Swan


Soundtrack Pro


Livetype

Editing Jelly Babies Animation


Jelly Babies Animation


Prelim Production

Sunday 6 February 2011

Title Sequences that inspire me ! ; Casino Royale


Daniel Klienman is a British director most famous for creating title sequences for James Bond, the movie. Klienman’s title sequence for ‘Casino Royale’ involved black and white images of Bond, filled with different patterns and symbolic objects such as cards. Klienman’s work is done in a collage style with a collection of different images stuck together. To create his work Klienman uses computer generated images. His style of work is extremely decorative and symbolic.


When I initially saw Klienman’s work I thought it was interesting, I thought that the way in which he used different objects to symbolize the films narrative and plot was smart, it made me want to see more and more. After researching his work I thought that it might be good to incorporate this into my groups work later on because I liked the black and white effect.

Basic facts about fonts


Serif is a traditional font used for centuries it has something that we call a 'tail' at the end of each letter as shown in the image above. San Serif fonts are more modern and they do not contain tails there are more simplistic in terms of shape.


Tips on using camera equipment!!

Tips on using camera equipment!!!
Here is my slide show on Camera tips!

Thriller Audiences


.

Camera shot lengths

1 . Extreme long shot

Extreme Long Shot showing Hollywood sign
The extreme long shot on the left is taken from a distance, but denotes a precise location - it might even connote all of the entertainment industry if used as the opening shot in a news story.
Long shot

2. Long Shot

This is the most difficult to categorise precisely, but is generally one which shows the image as approximately "life" size ie corresponding to the real distance between the audience and the screen in a cinema (the figure of a man would appear as six feet tall). This category includes the FULL SHOT showing the entire human body, with the head near the top of the frame and the feet near the bottom. While the focus is on characters, plenty of background detail still emerges: we can tell the coffins on the right are in a Western-style setting, for instance.
Medium shot of a street musician

3. Medium Shot

Contains a figure from the knees/waist up and is normally used for dialogue scenes, or to show some detail of action. Variations on this include the TWO SHOT (containing two figures from the waist up) and the THREE SHOT (contains 3 figures...). NB. Any more than three figures and the shot tends to become a long shot. Background detail is minimal, probably because location has been established earlier in the scene - the audience already know where they are and now want to focus on dialogue and character interation. Another variation in this category is the OVER-THE-SHOULDER-SHOT, which positions the camera behind one figure, revealing the other figure, and part of the first figure's back, head and shoulder.
close up
Close up

4. Close-Up

This shows very little background, and concentrates on either a face, or a specific detail of mise en scène. Everything else is just a blur in the background. This shot magnifies the object (think of how big it looks on a cinema screen) and shows the importance of things, be it words written on paper, or the expression on someone's face. The close-up takes us into the mind of a character. In reality, we only let people that we really trust get THAT close to our face - mothers, children and lovers, usually - so a close up of a face is a very intimate shot. A film-maker may use this to make us feel extra comfortable or extremely uncomfortable about a character, and usually uses a zoom lens in order to get the required framing.
Extreme Close up of a cat's eye
Extreme Close Up

5. Extreme Close-Up

As its name suggests, an extreme version of the close up, generally magnifying beyond what the human eye would experience in reality. An extreme close-up of a face, for instance, would show only the mouth or eyes, with no background detail whatsoever. This is a very artificial shot, and can be used for dramatic effect. The tight focus required means that extra care must be taken when setting up and lighting the shot - the slightest camera shake or error in focal length is very noticeable.


Ideas ; Camera Angles


The Bird's-Eye view

This shows a scene from directly overhead, a very unnatural and strange angle.

Eye Level

When a  camera is placed approximately five to six feet from the ground. 
Low Angle
These increase height  and give a sense of speeded motion. Low angles help give a sense of confusion to a viewer, of powerlessness within the action of a scene. The background of a low angle shot will tend to be just sky or ceiling, the lack of detail about the setting adding to the disorientation of the viewer. The added height of the object may make it inspire fear and insecurity in the viewer, who is psychologically dominated by the figure on the screen.

Oblique/Canted Angle

Sometimes the camera is tilted , to suggest imbalance, transition and instability , this isvery popular in horror/thirller movies. 

Here's a video on camera angles


Friday 4 February 2011

Camera Movements

In my groups thriller we are going to show a variety of camera movements. Camera movements can change the emotion of a particular scene and effectively will make it better. I decided to do some research on camera movements so that I can apply different ideas to my groups thriller film.

Check out the 6 Different camera movements below


Pans

A Panning shot is a horizontal movement. Once a camera is placed on a tripod, the tripod itself is a axis point and the camera is turned, often to follow a moving object which is kept in the middle of the frame.

Tilts


A movement which is opposite to the pan shot being that it is a vertical movement.


 Tracking shot

A shot that generally follows a moving figure or object, A tracking shot is a good way of following the journey of a character and making the audience focus on a object or character.


 Hand-held shots


A hand-held shot is basically when i person carries the camera in their hand. Hand held cameras denote a certain kind of gritty realism, they make the audience feel as though they are part of a scene.
 Zoom Lenses
A zoom lens contains a mechanism that changes the magnification of an image. On a still camera, this means that the photographer can get a 'close up' shot while still being some distance from the subject. A video zoom lens can change the position of the audience, either very quickly (a smash zoom) or slowly, without moving the camera an inch, thus saving a lot of time and trouble.


The Aerial Shot

An Aerial shot is often used at the beginning of a film, in order to establish setting and movement.


Watch this video about camera movements !

Tips on editing!!

For editing our short thriller film we will be using a programme called 'Final Cut Pro', so here are some basic tips on  how to use it!


  •  To cut shots use the I and O buttons. I = Input and O = Output
  • Organise your time line, make sure your shots are right next to each other or unfortunately you will have a large gap in between each shot.
  • The the razor blade (which can be found in the tool box) cuts the shots.
In Media studies we take a lot of photographs , film a variety of shots and print screen our edits so that you can see how we develop our ideas. 
  • To upload a video or slideshow into Blogger , click on File (In the top of your screen)
  • Then click on export
  • Save as Quicktime (MP4) make sure that theres a tick where it says make movie self contained
  • Save your video
  • And now open Handbrake (a software that enables you change the file size of a video)
  • Once you've got into Handbrake open your video
  • Clilck Start twice and your video should be complete.
  • Close Handbrake 
  • Open blogger and import your video
HERE IS A VIDEO TUTORIAL ON FINAL CUT PRO ENJOY!!